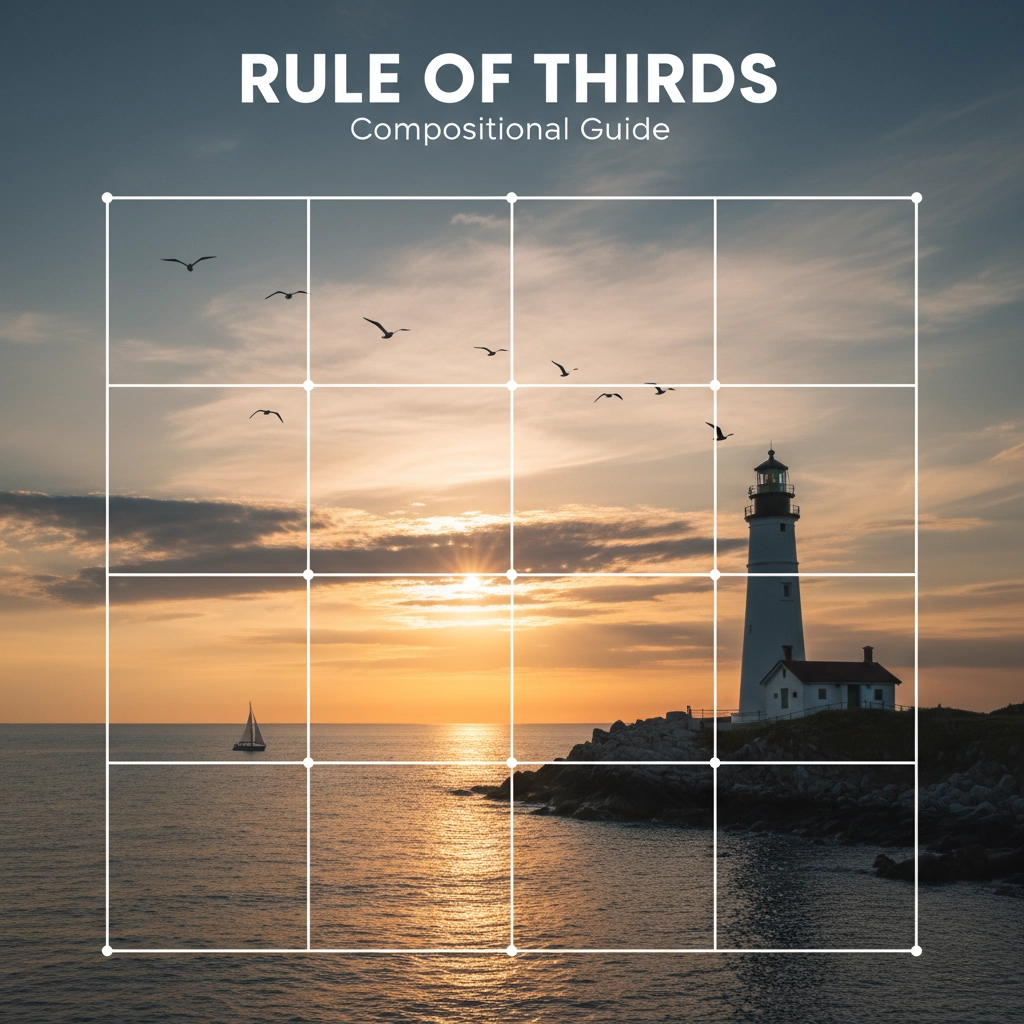
Capturing visually appealing and balanced images is a goal of every photographer. One effective technique that can help achieve this is the “Rule of Thirds.” So what is the rule of thirds in photography? The Rule of Thirds in Photography is a basic principle composition that involves dividing an image into a grid of nine equal parts using two horizontal and two vertical lines, resulting in four intersecting points.
By placing key elements along these lines or at the intersections, photographers can create a more dynamic and visually pleasing composition. In this blog article, we will delve deeper into the concept of the Rule and explore how it can be used to enhance your photography.
Understanding the Rule of Thirds
The Rule is a compositional guideline that dates back to the 18th century and is based on the concept of the golden ratio, a mathematical ratio of 1:1.618 that is believed to be aesthetically pleasing to the human eye.
The Rule of Thirds composition divides an image into a grid of nine equal parts by placing two horizontal lines and two vertical lines at equal intervals. The resulting grid forms four intersecting points known as “power points” or “points of interest.” The trick is How to Use The Rule of Thirds.
5 Simple Composition Steps to Using the Rule in Photography
The Rule in Photography can be effectively used in various genres of photography, including landscape, portrait, street, and still life. Here are some ways you can use the Rule to improve your compositions, how to use the thirds:
- Placing subjects off-center: Instead of placing your subject in the center of the frame, try positioning it along the grid lines or at the intersections. This can add visual interest and create a more dynamic composition. For example, in a landscape photo, you might position the horizon along one of the horizontal lines, while placing a tree or a prominent object at one of the intersections.
- Creating balance and harmony: The Rule can help you achieve balance and harmony in your photos. By distributing the visual weight of your subjects or elements across the grid, you can create a sense of balance in your composition. For instance, if you have a subject on one side of the frame, you can balance it out by placing a smaller subject or an object on the opposite side along the grid line or intersection.
- Guiding the viewer’s eye: Placing important elements along the grid lines or intersections can act as visual cues that guide the viewer’s eye through the image. This can help create a sense of flow and lead the viewer’s gaze to the intended focal point. For example, in a portrait, you can position the subject’s eyes along the top horizontal line, drawing the viewer’s attention to the subject’s face.
- Adding depth and dimension: The Rule can also be used to add depth and dimension to your photos. Placing elements at different depths along the grid lines or intersections can create a sense of depth and give your images a three-dimensional feel. For instance, in a street photo, you can position a person walking along one of the vertical lines while capturing the background along another vertical line, creating a sense of depth and dimension.
- Experimenting with different compositions: The Rule is not a strict rule, but rather a guideline that can be experimented with. You can use it as a starting point and then choose to deviate from it to create unique compositions that suit your artistic vision. For example, you can try placing your subject at the center of the frame or deliberately breaking the grid to create a sense of tension or surprise in your photo.
The Rule of Thirds in photography is a powerful compositional tool that can help you create visually appealing and balanced photos. By placing your subjects or elements along the grid lines or intersections, you can add interest, balance, and depth to your compositions, while guiding the viewer’s eye and creating a sense of flow. However, it’s important to remember that the Rule is not a strict rule, but rather a guideline that can be used creatively.
As a photographer, you have the artistic freedom to experiment and deviate from the Rule in photography to create unique and compelling compositions that suit your style and vision.
Practical Tips
- Use the grid lines and intersections: Most modern cameras and smartphones have an option to display the Rule of Thirds grid in the viewfinder or on the screen. Take advantage of this feature to align your subjects or elements along the grid lines or at the intersections or even breaking the rule of thirds! You can also visualize the grid in your mind’s eye if your camera does not have this feature. Remember to keep the grid in mind while composing your shot, and try to place your subjects or elements intentionally along the grid lines or intersections.
- Consider the placement of your subject: Instead of placing your subject right in the center of the frame, try positioning it along the grid lines or at the intersections. This can create a more dynamic and visually pleasing composition. For example, in a landscape photo, you can place the horizon along one of the horizontal lines, while positioning a tree or a prominent object at one of the intersections. In a portrait, you can position the subject’s eyes along the top horizontal line, drawing the viewer’s attention to the subject’s face.
- Achieve balance and harmony: The Rule in photography can help you achieve balance and harmony in your photos by distributing the visual weight of your subjects or elements across the grid. Avoid placing all the elements of your photo on one side of the frame, as it can create an imbalance. Instead, try to distribute the visual weight across the grid lines or intersections. For example, if you have a subject on one side of the frame, you can balance it out by placing a smaller subject or an object on the opposite side along the grid line or intersection.
- Guide the viewer’s eye: Placing important elements along the grid lines or intersections can act as visual cues that guide the viewer’s eye through the image. This can help create a sense of flow and lead the viewer’s gaze to the intended focal point. For example, in a landscape photo, you can position a road or a river along one of the diagonal lines, leading the viewer’s eye into the image. In a still life, you can position the main subject along one of the vertical lines, drawing the viewer’s attention to it.
- Create depth and dimension: The Rule in photography can also be used to add depth and dimension to your photos. Placing elements at different depths along the grid lines or intersections can create a sense of depth and give your images a three-dimensional feel. For example, in a street photo, you can position a person walking along one of the vertical lines while capturing the background along another vertical line, creating a sense of depth and dimension.
- Experiment with different compositions: While the Rule in photography is a useful guideline, don’t be afraid to experiment and deviate from it to create unique compositions. You can use the Rule of Thirds as a starting point and then choose to break the grid, place your subject at the center of the frame, or use unconventional compositions to create a sense of tension or surprise in your photos. Remember that photography is an art form, and rules are meant to be broken. Trust your creative instincts and try different compositions to find your own unique style.
- Consider the background: When using the Rule in photography , it’s not just about the placement of your subject or main elements, but also about considering the background. The background can greatly impact the overall composition of your photo.
- Pay attention to the background and how it interacts with your subject or main elements. Avoid distractions or cluttered backgrounds that may detract from your subject. Use the Rule of Thirds to position the background elements strategically along the grid lines or intersections, creating a visually pleasing balance between the subject and the background.
- Keep the Rule in mind while editing: The Rule of Thirds in Photography can also be applied during the post-processing stage of your photography workflow. When cropping or editing your photos, you can use the Rule as a guide to help you make decisions about the placement of your subjects or elements. You can also use the Rule of Thirds to straighten horizons or align elements for a more balanced composition. Many photo editing software programs provide overlays or grid options that can help you apply the Rule while editing your photos.
- Practice and experiment: Like any skill in photography, mastering the use of the Rule takes practice. Take the time to study and understand the concept of the Rule of Thirds, and then go out and practice applying it in your photography. Experiment with different compositions, subjects, and genres to see how the Rule of Thirds can be applied creatively in different situations. With practice, you will develop an instinctive sense of how to use this Rule of Thirds effectively to enhance your compositions and create visually appealing photos.
The Rule of Thirds in Photography is a fundamental compositional guideline in photography that can help you create visually pleasing and balanced compositions. By dividing your frame into a grid of nine equal parts and placing your subjects or elements along the grid lines or intersections, you can achieve balance, create depth, guide the viewer’s eye, and add visual interest to your photos.
However, it’s important to remember that the Rule in Photography is not a strict rule, but a flexible guideline that can be used creatively. Experiment with different compositions, practice, and trust your creative instincts to find your own unique style. Check out some photographs in my other blogs and identify those that I applied the rule too? or not?
FAQs
What is the Rule of Thirds in photography?
The Rule of Thirds is a compositional guideline used in photography where an image is divided into nine equal parts by two horizontal lines and two vertical lines, creating a grid. The theory is that by placing points of interest along these lines or at their intersections, you can create a more balanced and visually appealing photograph.
How does the Rule of Thirds work in composition?
The Rule of Thirds suggests that you should avoid placing your main subject in the center of the frame, but instead position it along the lines or at the intersections of the grid. This can create a more dynamic and visually interesting composition, leading to a more engaging photograph.
Why is the Rule of Thirds important in photography?
The Rule of Thirds is important in photography because it helps photographers create visually balanced and interesting compositions. It can add visual tension, create a sense of flow, and guide the viewer’s eye to the main subject or points of interest in the photograph.
Can you explain the concept of “grid” in the Rule of Thirds?
The grid in the Rule of Thirds is a virtual grid that divides the frame of a photograph into nine equal parts with two horizontal lines and two vertical lines. The points where these lines intersect are known as the “power points” or “points of interest.” Placing the main subject or points of interest along these lines or intersections can create a more visually pleasing composition.
How can I apply the Rule of Thirds to my photos effectively?
To apply the Rule of Thirds effectively, you can use the grid overlay feature available in many cameras or image editing software to guide your composition. Position your main subject or points of interest along the lines or intersections of the grid to create a more visually appealing photo. You can also use the Rule of Thirds as a reference when cropping or editing your photos.
Are there any exceptions to the Rule of Thirds in photography?
Yes, there are exceptions to the Rule of Thirds in photography. It is a guideline, not a strict rule, and there may be situations where placing the main subject in the center of the frame or deviating from the grid can create a desired effect or convey a specific message. The Rule of Thirds can be broken intentionally for creative purposes, but it’s important to understand and apply it effectively before deviating from it.
How does the Rule of Thirds affect the balance and visual interest in a photo?
The Rule of Thirds can affect the balance and visual interest in a photo by creating a sense of asymmetry and dynamic tension. Placing the main subject or points of interest along the lines or intersections of the grid can create a visual flow and lead the viewer’s eye through the photograph, making it more engaging and visually appealing.
What are some tips for using the Rule of Thirds to create more visually appealing photos?
Some tips for using the Rule of Thirds effectively in photography include:
Positioning the main subject or points of interest along the lines or intersections of the grid.
Using the grid overlay feature in your camera or image editing software as a reference.
Experimenting with different placements of the subject or points of interest to find the most visually pleasing composition.
Being mindful of the overall balance and flow of the photo.
Practicing and refining your composition skills over time to develop your artistic eye.
Like what you read? Fuel my next post with a coffee – hit that PayPal button and keep the caffeine flowing!
[wpedon id=77]